After the long and winding road of attempts at getting hardware encoding working on my AMD VEGA 64 graphics card I have finally reached the final destination! That's right! I have hardware encode working. I know, I know. Many others have had it working before but I've never been able to find much information about getting it working in OBS Studio. Much less a readable how-to. I compiled OBS from source to include several of the included plugins but was able to use standard Fedora 29 packages otherwise.
I'll not dilly dally any longer. Here is my mostly complete how-to.
The following instructions are for FEDORA 29 only. Your mileage may vary on other Fedora versions.
First start off by installing dependencies needed by Fedora 29.
sudo dnf install gcc gcc-c++ gcc-objc cmake git libX11-devel mesa-libGL-devel libv4l-devel pulseaudio-libs-devel x264-devel freetype-devel fontconfig-devel libXcomposite-devel libXinerama-devel qt5-qtbase-devel qt5-qtx11extras-devel libcurl-devel systemd-devel ffmpeg luajit-devel swig python3-devel ffmpeg-devel qt5-qtsvg-devel ImageMagick-devel mbedtls-devel libva-devel ImageMagick-libs libva-vdpau-driver
After you have your dependencies in order you'll want to download the source for OBS Studio via git.
git clone --recursive https://github.com/obsproject/obs-studio.git
After you have your source downloaded you'll want to enter the source directory and create your cmake build directory.
cd obs-studio ; mkdir build ; cd build
With the build directory made and entered you'll want to use the following cmake command to configure the OBS Studio source.
cmake -DCMAKE_PREFIX_PATH=/usr -DUNIX_STRUCTURE=1 ..
Hopefully cmake finishes without error so you'll be ready to compile. As far as I remember the above dependencies should be enough to get you going. Next you'll want to build the source.
make -j<the number of CPU threads you have>
After the 'make -j' you will want to put the number of CPU threads you have. As an example if you have a 4 core plus hyperthreading system you'll have 8 threads. So you will use 'make -j8'. This will speed up the compilation time. If you don't care about speed you can use plain old 'make' with no options.
When the build finishes without error you'll be ready to install OBS Studio into it's final resting place. To do so type in the following command.
sudo make install
At this point you are mostly ready to go. All that remains is configuring OBS Studio to use the FFMPEG VAAPI plugin for hardware encoding. To do so you'll want to start up OBS and click on the '
Settings' button in the lower right corner of the main window. Next click on '
Output' from the left hand column. This is where you'll set the FFMPEG VAAPI plugin to encode.
First under '
Output Mode' you'll select '
Advanced' from the drop down menu. After '
Advanced' is selected it'll open up more options than before. Next refer to the below image for the settings I used to enable stable hardware encoding. I run a 2560x1440 monitor resolution so I needed to set the '
Rescale Output' to 1920x1080. Pay attention to the '
Encoder' drop down menu, this is where you toggle between hardware and software encoding.
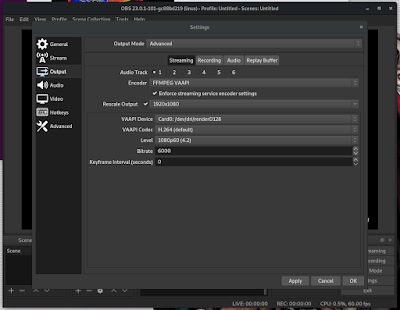 |
| Click for bigger view |
Originally when using software encoding I'd sit at about 30% CPU usage when encoding at 1080p @ 60FPS on my RYZEN 7 1700x system. After configuring FFMPEG VAAPI hardware encoding I sit at about 2% while streaming with the same settings to Twitch.
If any of the above doesn't work for you please feel free to leave me a comment and I'll do my best to help you through your issues.
